Overview
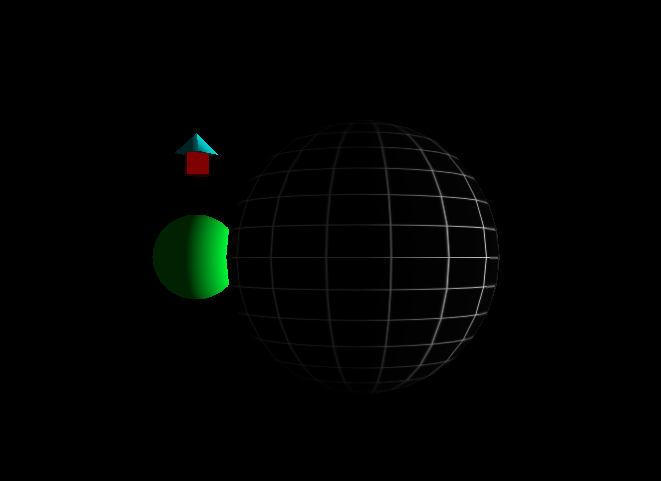
In this exercise, set up a rotating grid sphere at the centre and have a planet orbit around it. The orbiting planet will shoot a spinning rocket as it goes around the centre sphere. Build the rocket using box and cone geometry.
Orbiting Planet Codepen: https://codepen.io/xrclub/full/ExQPwWQ
Getting Started: https://codepen.io/xrclub/full/eYVJGBE
On The Plane
The scene, camera, lighting, and renderer need to be set up beforehand, as in the Getting Started exercise. If you need help remembering how it all works, check that exercise out before starting. Here, we will just focus on creating the orbiting planet 3D scene.
Here are the instructions:
- load 2D texture image
- set up grid sphere
- set up planet
- set up rocket
- define orbit radius
- update animation logic
Step 1: load 2D texture image
Start by loading the 2D grid texture using the loader provided by THREE.js. Set the texture properties of the wrapping modes for wrapS and wrapT to repeat wrapping. Finally, scale the texture so that it repeats twice in both the ‘S’ and ‘T’ directions.
// Load 2D texture image for the plane
const gridTexture = new THREE.TextureLoader().load( "https://res.cloudinary.com/vjy/image/upload/c_fit,h_ih,w_ih/kdsaeye4m3eajlq5m0x4" );

// Set texture properties
gridTexture.wrapS = THREE.RepeatWrapping;
gridTexture.wrapT = THREE.RepeatWrapping;
gridTexture.repeat.set( 2, 2 );
Step 2: set up grid sphere
First set up the centre sphere, by creating a new geometry and textured material for the sphere then build a mesh. The numbers within the sphere geometry specify the radius, width segments, and height segments, respectively. To map a texture, use the previously loaded grid texture and assign it as the texture of the standard material. Finally, add the central sphere to the scene.
// Set up sphere geometry and map the grid texture to the material
const sphereGeom = new THREE.SphereGeometry( 20, 30, 16);
const sphereMaterial = new THREE.MeshStandardMaterial( {
     map: gridTexture
} );
// Create a grid sphere mesh
this.gridSphere = new THREE.Mesh( sphereGeom, sphereMaterial );
this.scene.add( this.gridSphere );
Step 3: set up planet
Next, set up the planet orbiting the central sphere. Repeat the same procedure as before for creating the first sphere, however this time adjust the sphere’s properties and material colour so that it looks more like a planet! Remember to add the planet mesh to the scene.
// Set up planet geometry and material
const planetGeom = new THREE.SphereGeometry( 10, 30, 16);
const planetMaterial = new THREE.MeshStandardMaterial( {
     color: 0x00ff00
} );
// Create planet mesh
this.planetMesh = new THREE.Mesh( planetGeom, planetMaterial );
this.scene.add( this.planetMesh );
Step 4: set up rocket
Now let’s build a rocket and place it on top of the planet. Use a box geometry for the rocket body and a cone geometry for the nose cone. Following up on what you’ve learned from the lesson on scene graphs, add the nose cone as a child to the rocket’s body, then add the rocket to the planet’s mesh created earlier.
// Set up rocket body geometry and material
const rocketBodyGeom =  new THREE.BoxGeometry( 5, 5, 5);;
const rocketBodyMaterial = new THREE.MeshStandardMaterial( {
     color: 0xff0000
} );
// Create rocket body mesh
this.rocketBodyMesh = new THREE.Mesh( rocketBodyGeom, rocketBodyMaterial );
this.rocketBodyMesh.position.set(0, 10, 0);
// Add rocket body to the planet mesh
this.planetMesh.add( this.rocketBodyMesh );

// Set up nose cone geometry and material
const noseConeGeom = new THREE.ConeGeometry( 4, 5, 32);
const noseConeMaterial = new THREE.MeshStandardMaterial( {
     color: 0x00ffff
} );
// Create nose cone mesh
this.noseConeMesh = new THREE.Mesh( noseConeGeom, noseConeMaterial );
this.noseConeMesh.position.set(0, 5, 0);
// Add nose cone to the rocket's body mesh
this.rocketBodyMesh.add( this.noseConeMesh );
Step 5: define orbit radius
The orbit radius, which is the distance between the centre sphere and the planet’s origin, will need to be determined in order to create a circular orbit path.
// Define orbit radius
this.orbitRadius = 50;
Step 6: update animation logic
In the update method, which is called every frame, define the animations for the following:
gridsphere: Make the gridsphere rotate around its y-axis.
planet: Make planet perform a circular orbit around the grid sphere
rocket: The increment the rocket’s position on its y-axis, to simulate a launch. If it exceeds a certain height, reset back to its original position. The rocket body should also rotate around its y-axis.
update(dt){
  this.gridSphere.rotation.y = 0.5 * dt;
  // Make planet perform a circular orbit around the grid sphere
  this.planetMesh.position.set(
    Math.sin(dt) * this.orbitRadius,
    0,
    Math.cos(dt) * this.orbitRadius
  );
  // Reset rocket's position if distance is over max limit
  if(this.rocketBodyMesh.position.y > 50) {
    this.rocketBodyMesh.position.y = 0;
  }
  this.rocketBodyMesh.position.y += 0.5;
  this.rocketBodyMesh.rotation.y = 10 * dt;
  // Render the scene to the screen (draw it to the screen)
  this.renderer.render(this.scene, this.camera);
}
Result
See the Pen Scene Graph – Orbiting Planet by XR Club (@xrclub) on CodePen.